Making a mould of an ancient Etruscan head and casting copies. For North Hertfordshire Museums Resource Centre.
Preparing for moulding: Although incomplete and with a very rough and patinated surface, this hollow head of an ancient Etruscan
terracotta statue was in sound condition and clean. However, it was extremely porous and had many holes and cracks in the surface so the specimen needed to be
protected from the moulding process. If appropriate precautions were not taken, the rubber could enter the cracks and holes and would be difficult to remove,
damaging the surface when pulling the rubber away as well as leaving minute amounts of rubber permanently embedded in the terracotta.
To protect the surface and make it more robust temporarily, a temporary barrier layer (soluble in water and therefore easily reversible)
was used in a dilute form. A reversible water-soluble putty was used to fill the holes and cracks to prevent unwanted penetration of the moulding rubber.
As a two piece mould was to be made of the head, the ‘flashline’ of the mould (where the two halves of the cast were to be joined)
was orientated along the sides of the face, along the ears and the edge of the hair where the flashline would be least noticeable.
It was laid-up in this orientation ready for moulding using Plastecene, taking care that as little of the Plastecene as possible actually
came into contact with the specimen even though it was protected with a barrier layer.


Left and middle: photos of the hollow terracotta head before moulding. Right: the two-part mould made.
Moulding: A high quality silicone rubber was applied initially as a thin layer to the exposed side of the head to take up the detail.
Once this had set, several layers of the same rubber were applied with a thixotropic additive to make it stiffer so it did not slump.
After the desired thickness of rubber was achieved all over this first half of the head the rigid part of the mould was made with a strong resin.
Once this had set hard, the whole specimen in its mould and laid-up in its Plastecene was turned over. The Plastecene was then carefully removed from the
rubber and the specimen. When all the Plastecene had been removed, a layer of thin rubber was applied to the second half of the head
and left to set.
The process above was then repeated for the second half of the mould.
De-moulding and cleaning: Once the second half of the mould had set, the hard and soft parts of the mould were very carefully removed,
being particularly careful of any undercuts. The water soluble putty was then removed from the head, and the barrier layer, and the head was gently cleaned.
The head was inspected and it was found that it had suffered no damage at all.

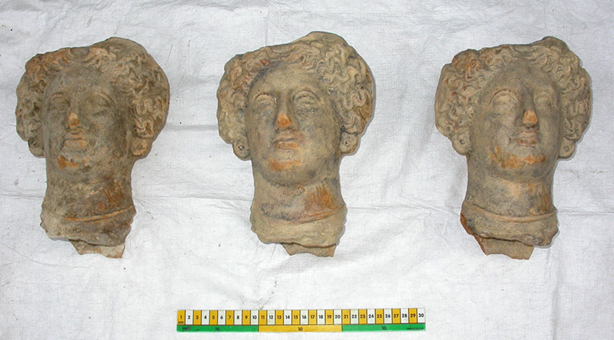
One is the original and two are painted casts. Which are which?....
Casting: The inside portions of the rubber moulds were cleaned with warm water to remove traces of the water soluble putty and dirt,
and returned to the rigid portions of the moulds. A resin gelcoat was applied to the two halves of the mould, followed by several applications of the resin
with glass fibre matt. Just before the last layer had set the two halves of each mould were placed together and rotated a few times by hand so that resin flowed from one half to the other. Once set, the moulds were removed and the flashline of the casts were trimmed with a sharp knife. The casts were painted with artists acrylic paints.


Left: one of the casts before being painted. Right: one of the casts after being painted.
For more details about what we can do for you, or for a quote, please
contact:
enquiries@natural-history-conservation.com
We
are members of the United Kingdom Institute for Conservation of Historic and
Artistic Works