The cleaning, repair and remounting of a badly damaged skeleton of a Heavy-Footed Moa, for Leeds Museums.
Leeds Museums and Galleries have a complete skeleton of a Heavy-footed Moa Pachyornis elephantopus (now extinct) from New Zealand.
It was acquired in 1868 and used to be on display in the Philosophical Hall in Leeds but more recently
has ben stored at Leeds Museum Discovery Centre (LMDC).
By 2010 it was recognised that it was badly in need of repair, consolidation, cleaning, re-articulation and mounting - which Nigel Larkin was happy to undertake.
Cleaning the bones: The whole skeleton required cleaning as it was covered with dust, dirt,
sooty particulates and fluff (see images below). This was removed with a very soft brush used next to the hose of
a vacuum cleaner to remove the debris. Then, areas that were still extremely dirty and often very dark were cleaned
with a gentle conservation detergent, an alcohol ethoxylate. It was applied to small areas at a time with a soft brush, then wiped away immediately with a lint-free paper towel. Then the area was cleaned again with clean water (with no detergent) and immediately dried again with a paper towel.


Far left: dirty vertebrae. Left: the top two vertebrae have been cleaned, and the lower ones are
still dirty.
Right: the upper portion of the femur has been cleaned, the lower half is still dirty. Far right: The main portion of the skeleton had been inappropriately stored, with the fragile ribs taking some of the weight. As a result many were broken, and some had fallen off.
Repairs and conservation:
Materials used: Paraloid B72. This is a reversible methacrylate co-polymer used by many museum conservators either as an adhesive and consolidant. When used as an adhesive to repair a break, first an application of consolidant is applied either side of the break, to ensure a good bond. The consolidant used was Paraloid B72 in acetone at a strength of 10%. As a gap filler, consolidant at 25% in acetone (weight:volume) was mixed with glass beads 44 microns in diameter (Larkin and Makridou, 1999) to form a paste. This was used to assist in securing the ribs, where very porous fragile bone was unlikely to provide a secure connection on its own. Japanese tissue was used with neutral pH PVA to repair the skull, as described below.
Consolidation: The specimen did not need to be generally consolidated as suggested in the tender document. Although the bones are a little fragile this is to be expected of a specimen of this nature and it has to be treated with care. To have applied consolidant to all the bones would have reduced their biochemical integrity and would interfere with any attempts of biomolecule retrieval techniques in the future. Only very small amounts of consolidant were applied (by pipette) to areas that were going to require adhesive to repair a break with the exception of the pelvis. Here, some patches of surface bone had been lost in the past the very fragile inner trabecular bone was exposed and this was quite friable. These areas were consolidated (Paraloid B72 at 10%) to provide some strength.

 Legs and mounting: The femurs were found to be attached permanently to the metalwork and pelvis and could not be removed and the old metal
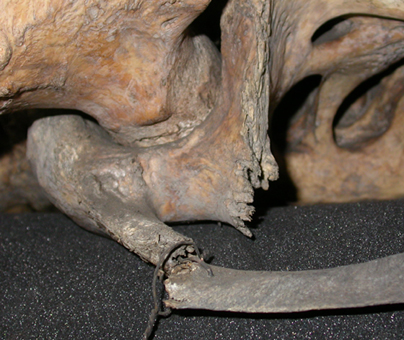
mounting could not be disassembled. The metal rods that used to run from the pelvis through the femurs and down through the tibiae to a wooden base
had been cut off at the �knees� with a hacksaw (left). As neither the femurs nor the metalwork could be removed, this left a very difficult situation -
particularly as the metalwork had been cut off quite tight to the bone. The only way that new metalwork could be used to support the skeleton through
the legs (as opposed to relying on external supports that would be visually intrusive) was to make some tubing the right shape in the knee area that
would fit around the existing metal rods projecting out of the distal ends of the femurs and into which metal could be inserted after running through
the tibias. Ideally, tubing would have been used to run up from a wooden base and through the tibias to the metal rods projecting out from the femurs,
but the narrow internal diameter of the marrow cavities of the tibias precluded this. The tibias accepted an appropriately-shaped 10mm bar with a struggle
(all the metalwork was hand- shaped on a forge). At the wooden base, the metal rod was welded to a flat iron bar which was securely screwed to the base
(see below, left) to give maximum strength and rigidity to the mount (it is useful to have quite a heavy base as the skeleton leans forward). These bars were
shaped to run through the tibias.
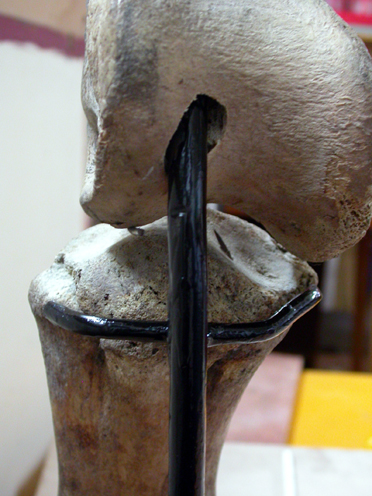
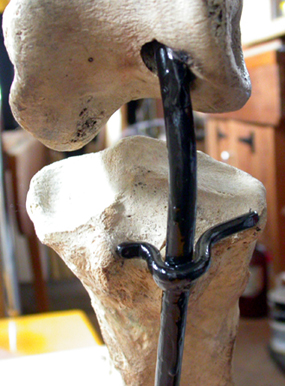
At the knees, between the tibia and femur, small sections of tubing were shaped appropriately on a forge, and welded
into place onto the rods projecting upwards from the proximal ends of each tibia (the bones were protected from
the welding with several layers of thick foil (see right)). The main body of the skeleton was lowered until the rods
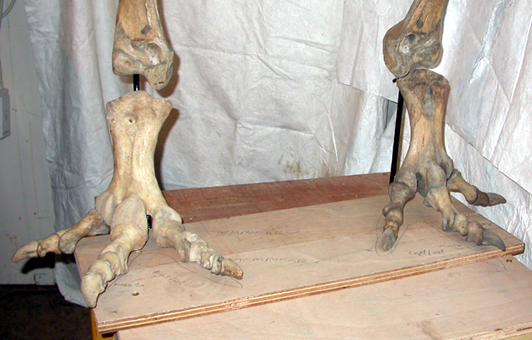
projecting out of the distal ends of the femurs were inserted into the tubes, then these were welded in place as well. Small metal brackets were forged to hold the feet in position. These were welded to the main metal
rods underneath the tibias (see below, middle and right).
Legs and mounting: The femurs were found to be attached permanently to the metalwork and pelvis and could not be removed and the old metal
mounting could not be disassembled. The metal rods that used to run from the pelvis through the femurs and down through the tibiae to a wooden base
had been cut off at the �knees� with a hacksaw (left). As neither the femurs nor the metalwork could be removed, this left a very difficult situation -
particularly as the metalwork had been cut off quite tight to the bone. The only way that new metalwork could be used to support the skeleton through
the legs (as opposed to relying on external supports that would be visually intrusive) was to make some tubing the right shape in the knee area that
would fit around the existing metal rods projecting out of the distal ends of the femurs and into which metal could be inserted after running through
the tibias. Ideally, tubing would have been used to run up from a wooden base and through the tibias to the metal rods projecting out from the femurs,
but the narrow internal diameter of the marrow cavities of the tibias precluded this. The tibias accepted an appropriately-shaped 10mm bar with a struggle
(all the metalwork was hand- shaped on a forge). At the wooden base, the metal rod was welded to a flat iron bar which was securely screwed to the base
(see below, left) to give maximum strength and rigidity to the mount (it is useful to have quite a heavy base as the skeleton leans forward). These bars were
shaped to run through the tibias.
At the knees, between the tibia and femur, small sections of tubing were shaped appropriately on a forge, and welded
into place onto the rods projecting upwards from the proximal ends of each tibia (the bones were protected from
the welding with several layers of thick foil (see right)). The main body of the skeleton was lowered until the rods
projecting out of the distal ends of the femurs were inserted into the tubes, then these were welded in place as well. Small metal brackets were forged to hold the feet in position. These were welded to the main metal
rods underneath the tibias (see below, middle and right).

Ribs The rib cage was very badly damaged due to the poor storage of the specimen over the years. The fragile rib cage and sternum had taken much of the weight of the front of the specimen, which it was not designed to do. As a result, some of the ribs had broken, the rib cage was misshapen, two ribs were completely detached from the rib cage and three others were partially detached (see below). Once the weight of the specimen was removed from the ribcage, the ribcage and sternum was manipulated back in to its proper shape. Then the detached ribs were reattached appropriately: reversible Paraloid B72 was used as an adhesive and where appropriate as a consolidant and gap filler to provide a secure connection. The modelled lower �ribs� connecting the main ribs to the sternum had been made out of a plaster or resin many years ago and these had suffered very badly during the poor storage. They were all severely cracked (see below) with some bits missing. Missing areas were modelled-in using Milliput epoxy putty, and cracks were filled either with Milliput or the Paraloid B72 gap filler described above (see below for images).


Left: right side of ribcage with badly cracked ribs, anteriormost rib half detached and the sternum is at the wrong angle. Right: The rib cage after cleaning, repositioning, repairing and gapfilling prior to painting.


Left: left side of ribcage, badly cracked with anteriormost rib half detached. Right: The rib cage after cleaning, repositioning, repairing and gapfilling prior to painting.
Pelvis Some parts of the pelvis had been damaged in the past (possibly during burial) and it has suffered from the loss of some surface bone, exposing fragile inner trabecular bone. This was consolidated, as described above. The left ischium was missing and the left pubis was broken and had been rewired in the past. This break looked unsightly and did not sit right. The two sides did not fit together well so the gap was bridged with Milliput epoxy putty after the sides were consolidated, and this was painted out.

Left: broken pubis, poorly wired together. Right: pubis after repair.
Skull and mandible The skull was cleaned as described above. The skull was in two pieces (almost certainly from two different individuals) and were not an exact match (see below). The skull pieces were attached together using Japanese Gampi tissue with neutral pH PVA (both standard conservation products, see Moore, 2007 ) and one small wooden �kebab skewer�, all painted with artists acrylic paints to blend in. The mandible was almost in one piece � it was partially broken at the symphysis. This was repaired with Paraloid B72 and gap-filled with a small amount of Japanese paper and neutral pH PVA. The mandible was re-hung from the skull with new wire after the remnants of the old wire had been removed (the wires attaching the mandible to the skull had clearly simply been cut prior to storage).
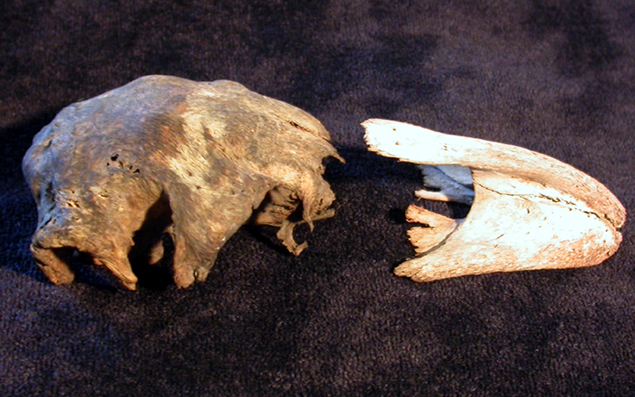

Left: skull before rejoining. Right: skull after rejoining (Japanese tissue is the white material underneath and on top of the skull, in the middle).
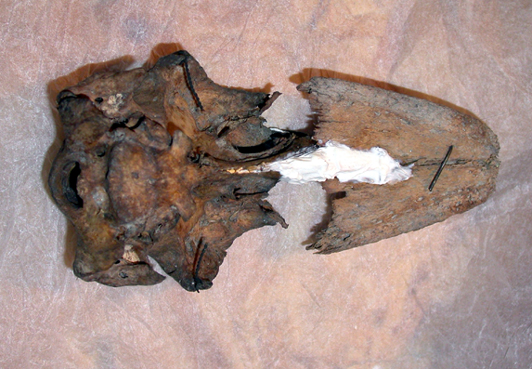

Left: skull (ventral view) after rejoining (Japanese tissue is the white material in the middle). Right: re-joined skull and repaired mandible after tissue has been painted out.

Mandible after cleaning and fixing (white Japanese tissue is at the symphysis to the far right).
Plinth The plinth made for the skeleton to stand on is permanent but as discussed at the tendering stage, appropriate Leeds Museum staff will make a �display quality� permanent covering for this base out of a nice hardwood such as mahogany or oak. The thickness of this cover has been allowed for when mounting the skeleton: the feet are currently positioned on two loose pieces of temporary wood. The final plinth will no doubt be made much larger.

Metalwork screwed to the plinth before the top of the plinth was screwed on.
References:
Larkin, N. and Makridou, E. (1999). Comparing gap-fillers used in conserving sub-fossil material . The Geological Curator 7 (2), 81-90.
Moore, S. J. 2007. Japanese Tissues: uses in repairing natural science specimens . Collection Forum 21 (1): 126-132.
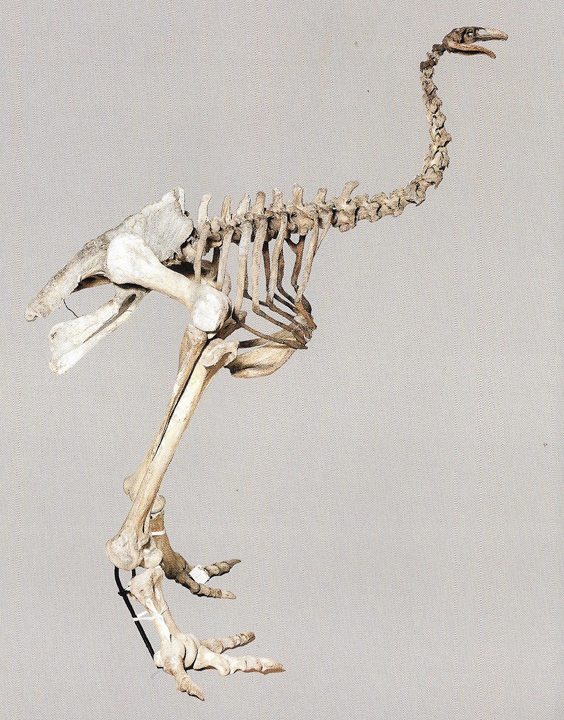
The cleaned, repaired, conserved and mounted specimen is below, as shown in the Leeds Museums and Galleries book 'Directors Choice' by John Roles, along with the accompanying text:


For more details about what we can do for you, or for a quote, please
contact:
enquiries@natural-history-conservation.com
We
are members of the United Kingdom Institute for Conservation of Historic and
Artistic Works