The cleaning, conservation and mounting of a 12 metre-long fin whale skeleton for the Tullie House Museum, Carlisle. Nigel Larkin, January 2018.
Introduction
This specimen is a partial skeleton of a juvenile or sub-adult fin whale that died in 2014 and washed up on the Cumbrian coast at Drigg Point (hence its nickname, Driggsby). Due to unavoidable delays in the carcass being collected, many bones are missing: the left side of the mandible, the left portion of the front of the skull including the maxilla, fourteen or fifteen vertebrae, both of the lower forelimbs below the humerus (except one ulna) and the small pelvic bones. As the specimen was to be mounted against the brick wall above the reception area, only some of these missing bones would need to be replicated: the vertebrae, lower right limb bones and the pelvic bones.
After being collected from the beach the carcass was buried for 18 months in sand and compost to aid in the defleshing process to clean the bones for research and display. However, at the start of the conservation and mounting project many of the bones still retained an odour, in particular the oily lumbar vertebrae which were still quite greasy and foul.
Cleaning the bones
Most of the bones required cleaning simply to remove the sand in which they had been buried (fig 1). This was undertaken with soft artists’ brushes and
a vacuum cleaner, and where required compressed air (e.g. to clean cracks, holes and foramen etc). Remains of soft body parts such as ‘gristle’ etc were
removed with scalpels and tweezers. Some bone surfaces had a white fatty substance still adhering to them, particularly the skull (fig 2), mandible and
some vertebrae. The lumbar vertebrae in particular were still partially covered in thick white fatty deposits and also had dark, sticky, oily areas (figs 3-8). These bones were still foul smelling and some had mould growing on them. These oils and/or fats had to be removed or the bone could degrade from the acidity quite apart from them being undisplayable in a public area due to the smell and appearance. The less substantial white fatty patches were largely removed by gentle scrubbing with brushes dipped in an IMS/acetone mixture but a white residue remained after trying to clear the thicker white areas. An attempt was made to clean the lumbar vertebrae by applying poultices of ethanol, acetone and ammonia in water but this did very little to improve the smell, oiliness or colour of the vertebrae tested. After discussions with many colleagues in the field of natural history it was decided that the bones needed to be buried for several months, even up to a year, in a good depth of manure. Excessive heat would damage the bones so the temperature had to be monitored.
1
2
3
4
5
6
7
8
9
10
Therefore the lumbar and thoracic vertebrae and their epiphysis disks plus the limb bones were buried in about a metre or so of dung in large secure
plastic tubs with lids (figs 9 & 10). The manure was regularly sprinkled with water and the temperature at depth was taken with a 12 inch thermometer probe.
The bones were removed and rotated a couple of times over a period of about six months and the manure mixed up each time to ensure the
evenness of the moisture and to prevent anaerobic conditions developing at the bottom of the pile. The temperature of the manure ranged from 19°C to a maximum of 60°C (briefly) but was mostly in the 20°C to low 30°C range. After removal from the manure the bones were immediately rinsed in water with light scrubbing to remove traces of the manure and were then placed into large tubs of ammonia hydroxide at about 4% in water for a minimum of a week to kill all the bacteria etc otherwise they would smell and could pose a pest risk once in the museum.
Conservation/repairs
There were not many repairs required. One chevron had to be rebuilt (fig 11). The broken surfaces were consolidated with Paraloid B72 in acetone at 5%,
then adhered together with Paraloid B72 adhesive (both consolidant and adhesive are reversible with acetone). As the portions of bone pieces joining
together was quite small with a large area of bone missing between them, some gap filling was undertaken with Japanese tissue paper with Paraloid adhesive
with the tissue also placed over the join to increase its strength. The largest area of missing bone was filled-in with plaster of paris (fig 12) after the
edges of bone had been consolidated with a barrier layer of Paraloid consolidant (in acetone at 10%). The plaster and Japanese tissue paper were painted to match the bone using artists’ acrylic paints (fig 13).
11
12
13
The epiphyseal disks of the vertebrae had to be matched-up with the relevant bones and adhered in place. Each vertebrae should have two disks, one anterior and one posterior (these fuse to the vertebra once the whale has reached adulthood and stopped growing). For most of the vertebrae this matching-up was relatively straightforward. However, many of the vertebrae had one or both disks missing, and there were many disks left over that were obviously from the missing vertebrae. Once paired up, the joining surfaces needed to be consolidated (on the disk and on the vertebra) with a reversible consolidant before adhering together with reversible adhesive.
Replication of the missing vertebrae
Where vertebrae were missing, the decision was made to mould the adjacent vertebrae and produce casts that would be painted to match.
This does mean that the vertebrae do not change gradually throughout some portions of the spine but have a noticeable ‘step change’
where sections of several casts met the real bones. However, it was decided that this would be better than simply leaving spaces. The missing vertebrae
were cast in Jesmonite AC100 acrylic resin with woven glass fibre matting. They were trimmed and shaped as far as possible to make them appear to change gradually from one shape to another but this was limited. For instance the neural spines could be trimmed down to make them change in size gradually, but to have modelled the transverse processes extensively to avoid a sudden step-change would have taken much more time than the budget allowed for. The casts were painted with artists' acrylic paints to match the adjoining vertebrae (figs 14 and 15).
14
15
16
17
18
Replication of the missing lower limb and pelvic bones
The right limb needed to be mounted but the only bones available were the scapula, humerus and ulna. Everything below the ‘elbow’ was missing,
excepting the ulna. About a year or so in advance of the mounting phase of this project, I was remounting the adult fin whale skeleton in Cambridge (see: http://www.natural-history-conservation.com/twomysteceti.pdf) so
Steven Dey of ThinkSee3D and I scanned the right limb of this whale using photogrammetry (with the permission of the Collections Manager).
Steven Dey then made a digital virtual 3D model of the limb and reduced it to the appropriate size (using the ulna as reference).
He then 3D-printed models of the bones in a gypsum powder. Steve had also scanned the single pelvic bone of the Cambridge specimen to mirror it and
3D print a model of the pelvic bone missing in the Cambridge skeleton. So he took the original digital model and scaled it down appropriately and
3D printed a suitable pair of pelvis bones for the skeleton of Driggsby.
Mounting the bones
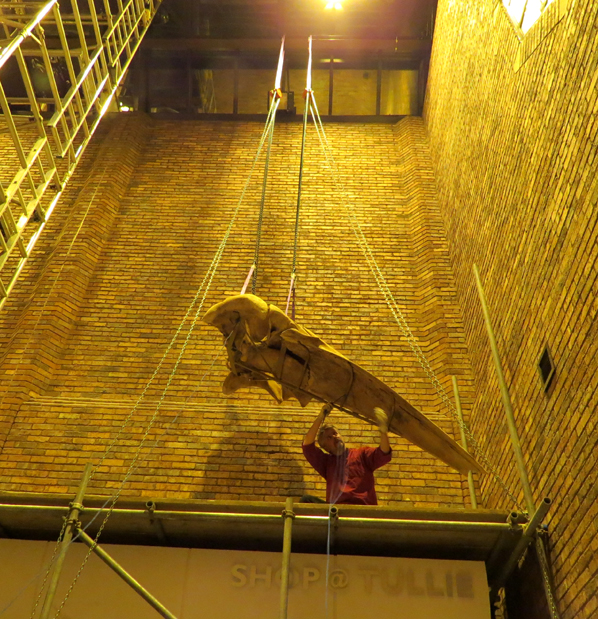
The shape the skeleton needed to take was dictated by the space available in the foyer above the reception desk.
There was not enough length to have the skeleton merely ‘floating’ in a horizontal resting pose, instead it had to be mounted
in a much more dynamic ‘S-shaped’ diving pose to squeeze it in, hung by cables from a beam in the ceiling. The structure and strength of each bone was assessed as the mounted specimen
was to be hung from the ceiling above a public area and therefore the bones needed to have sound structural integrity as well as the mounting methods.
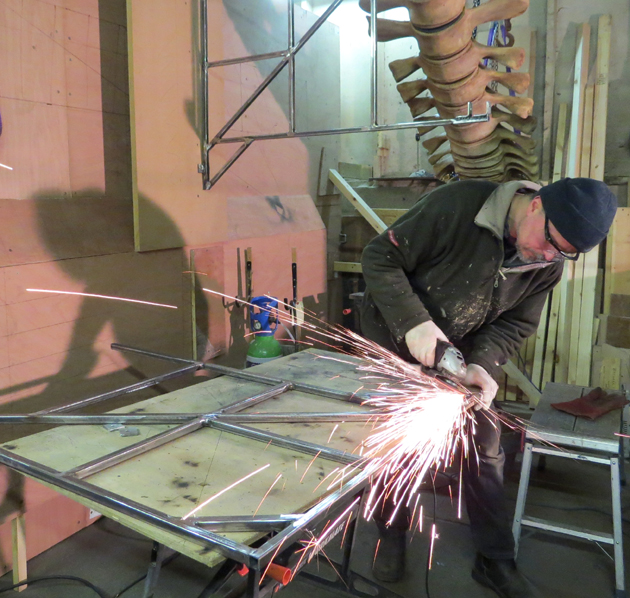
The material used for mounting the bones was sectins of stainless steel that were shaped appropriately on a forge and where necessary was MIG welded together.
All the metalwork was painted before the bones were mounted to further reduce the risk of rust forming over the decades.
Strips of 5mm-thick Plastazote foam were glued (with Paraloid B72) to the metalwork where it would touch the
bone so that as little of the bone as possible actually lay directly on the metalwork. As a substantial portion of the skull is missing on one side and it is therefore not symmetrically balanced, there are two metal brackets holding the skull in positon, to stop it twisting and to hold it in the exact midline so that the vertebral column matches up correctly. These brackets are made from sections of steel bar and sections of steel square cross section tube MIG welded together. These brackets are secured to the brick wall with four sections of threaded bar each, inserted into holes drilled in the brick and fixed in place with special chemical adhesive designed for the job.
The mandible could not be hung with wire from the metal beam above as the cables would have had to run through the skull. Instead, as the mandible is relatively light (less than 30kg) it is held in place with two more welded steel brackets very similar to the ones holding the skull in place. The vertebrae are threaded onto a hollow square cross section steel beam. Each of the vertebrae had to have a hole drilled into the centre of its centrum (vertebral disk) of an appropriate size so that the bone could be threaded on to the steel beam, tube or threaded bar that had already been curved to the right shape by heating on a forge and bending it. To stop the vertebrae from rotating independently of one another, a second but much smaller hole was drilled in teach centrum dorsal to the main central hole so that a thin 5mm diameter rod could be inserted through the vertebrae, to help keep them in line.
The vertebral column is in 4 sections, each lifted from and permanently hung from four separate points. Only the ribs of the right side of the skeleton needed to be mounted. However, because of this they could not be secured to the main metal vertebral beam as this would have meant the weight distribution would be extremely lop-sided. Instead, the weight of all the ribs had to be taken by the wall. This necessitated two more metal brackets to be made that would be secured to the brick wall with threaded bar, similar to those of the skull and mandible. The small metal rib brackets in turn were welded onto a larger metal frame that was bolted to the wall brackets (fig 16).
The radius, ulna and ‘wrist bones’ of the 3D-printed forelimb were mounted on a steel bar bent to their shape on a forge and secured to this steel bar using Jesmonite acrylic resin and fibre glass matting which bonds well to the gypsum of the models (this bar runs inside the hollow 3D models). All of the ‘finger’ bones were mounted on thick galvanised wire, again using Jesmonite resin. The 3D-printed models were painted with artists’ acrylic paints to match the rest of the skeleton (fig 18).
Below are photos of the mounting process and a time-lapse video of the installation process (with thanks to Mulholland Media for filming and editing etc).
Phil Rye, Simon Jackson and Gavin Campbell are all thanked for their help with the installation.
Below: Time lapse video of the installation in January 2018. Filmed and edited by Mulholland Media.
For more details about what we can do for you, or for a quote, please
contact: enquiries@natural-history-conservation.com We
are members of the Institute of Conservation.

 2
2 
 4
4  5
5  6
6  7
7  8
8  9
9  10
10 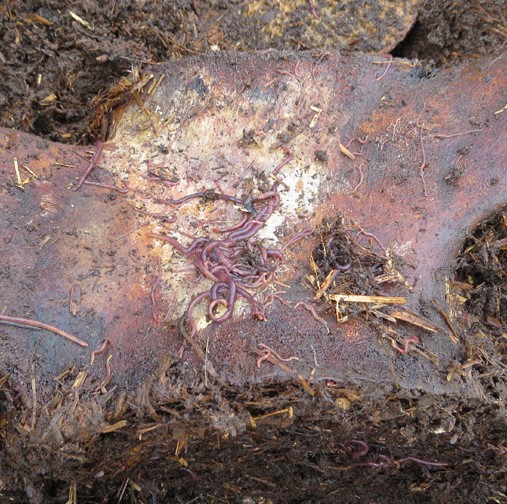
 12
12  13
13 
 15
15  16
16 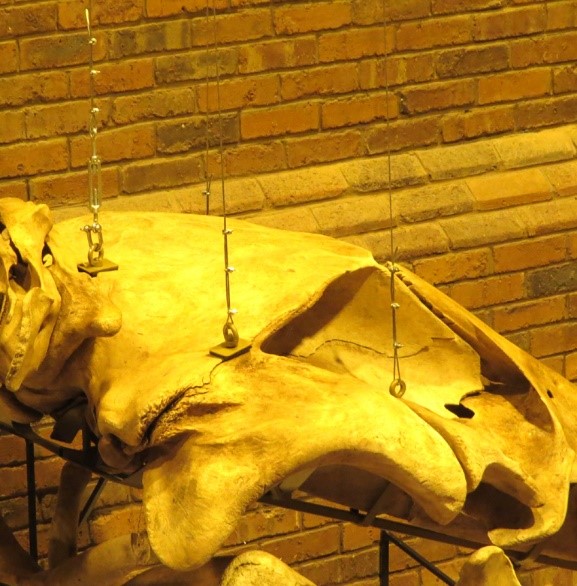 17
17