The cleaning, extensive repair, remounting and installation of another large and historically important Giant Deer skeleton for Edinburgh Museum (National Museums Scotland).
 This specimen is historically important as it was the first complete skeleton of a Giant Deer ever to be discovered. It was found on the Isle of Man in 1819 and brought to Edinburgh by the Duke of Atholl. In 1821 the skeleton was given to the University of Edinburgh, which had one of the world’s leading natural history collections at the time. The Keeper of the Collections at the University, Professor Robert Jameson, sent a sketch of the skeleton to the French zoologist Georges Cuvier, who published it in 1823 in his famous book Ossemens Fossiles. Through studying fossils, Cuvier was the first to demonstrate that some animals had become extinct. Discoveries like this skeleton confirmed his ideas.
This skeleton was installed at the end of the conservation project in the summer of 2011 (see photo to the left).
This specimen is historically important as it was the first complete skeleton of a Giant Deer ever to be discovered. It was found on the Isle of Man in 1819 and brought to Edinburgh by the Duke of Atholl. In 1821 the skeleton was given to the University of Edinburgh, which had one of the world’s leading natural history collections at the time. The Keeper of the Collections at the University, Professor Robert Jameson, sent a sketch of the skeleton to the French zoologist Georges Cuvier, who published it in 1823 in his famous book Ossemens Fossiles. Through studying fossils, Cuvier was the first to demonstrate that some animals had become extinct. Discoveries like this skeleton confirmed his ideas.
This skeleton was installed at the end of the conservation project in the summer of 2011 (see photo to the left).
The condition of the specimen before the conservation work commenced:
The whole skeleton was very dirty with dust, cobwebs and splatters of paint and old glue.
Many elements were broken (various limb bones, and the antlers were in several pieces) and these required repair.
It had been sampled in at least three places for varbon dating and isotope analysis (two places on the right antler main beam, one on the lower section of rear left leg) which left large gaps to be filled and modelled. Much of the specimen had been repaired in the past with thick araldite resin and/or thick twisted wire, and/or tin plates on the outside of the bone or antler, held with nuts and bolts or rivets.


Left, an example of dusty and dirty bones (vertebrae). Right, an example of scuffs to the antlers.


Left, an old failed join in the antlers, repaired previously with araldite resin and expoxy putty. Right, a femur head deeply fractured around the metal mount insertion.
Cleaning:
The specimen was very dusty and dirty, with loose wires and dribbles of old glue and paint. It was initially brushed gently with a soft brush and the dust caught by a vacuum cleaner nozzle. Then the surface was swabbed gently, one small area at a time, with a lightly damp cloth (water with a small amount of acetone to aid evaporation, to stop water soaking in) and the area was immediately dried with dry tissue before moving on to the next area. Old splashes of paint and glue were removed with a scalpel.
Repairs:
The broken ends of the damaged bones and antler tines were consolidated with Paraloid B72 (a reversible methacrylate co-polymer) at 10% or 15% in acetone before reattaching and adhering the separated pieces with Paraloid B72 adhesive. Large areas of missing bone were either filled with a paraloid gap filler consisting of Paraloid B72 adhesive at 25% in acetone mixed with glass beads 44 microns in diameter or substantial areas of missing bone or antler were filled with Jesmonite acrylic resin (AC100) bulked-out with a glass-bubble filler (sil-cell 300H) to make it more ‘workable’ and more easily modelled. Gap-fills and glues were painted-out with artists acrylic paints.
Mandible: An old break near the symphysis had failed, so the mandible was in two pieces. Some teeth were broken and the pieces were missing. When repairing the front of the mandible, a short thin metal rod was inserted into the hollow spaces of the bone, across the break, to provide more strength. As the rami of the mandible on both side had been broken in the past and re-glued, they were not considered strong enough to take the weight of the mandible when re-mounted, so a thin strong rod was glued in place to the rear of the mandible so that the mandible could be hung from the skull primarily from this when remounted. This was adhered in place with Araldite glue. This gave a stability to the mandible that meant the break at the front was much less likely to fail again.


Left, the broken mandible. Right, the repaired mandible with supporting rod at the rear.
Rear left leg: The astragalus was broken, with some pieces missing (see photo below, left) and these were
modelled-in with Milliput epoxy putty and painted . There was a deep gouge from a piece being sawn off for Carbon
dating or isotope analysis (see below right) and the lower portion of leg had separated from the upper two-thirds. It was reattached using the metal pins that inserted into the bones, and glued back in place.


Left: Damage to the astragalus. Right: lower limb that required modelling-in.
Front left leg: The distal end of humerus was fractured and required repair; the hoof was separated from the rest of the foot so this was wired back on. The shattered pieces of the tibio-fibula (see below left) were consolidated and glued, and a rod inserted inside the limb, around which Jesmonite acrylic resin (AC100 with phenolic plastic bubbles) was used to model-in the powdered areas of bone and to give strength to the whole bone.
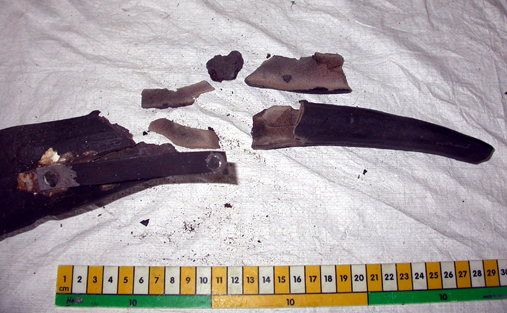
Front right leg: The ulna had been broken and wired together, a tarsal was broken and together with hoof was separated from the rest of the leg. Small metatarsal bones were wired together badly, and a metapodial riveted together in the past was now broken again and loose. The head of the femur was split and loose, and the lower portion of the radio/ulna had been completely shattered in the past and was riveted together (see below, right) but the pieces were loose.


Shattered tibio-fibula (left) and riveted limb bone (right).
Vertebrae: several vertebrae had been broken in the past and had pieces missing, but none required repair.
Ribs: several ribs were badly broken, some were broken and displaced and some were broken with pieces missing. These required modelling work. Three pairs of ‘before and after’ photos follow:


Skull and antlers: The main palms of the antlers had been joined together in the past with metal bands, riveted together. There were two deep cuts to the main beam of the right antler for sampling, and the main palm of the right antler was in five pieces, requiring a major amount of repair, internal support (metal rods) and modelling (with Jesmonite acrylic resin (AC100) bulked –out with plastic phenolic bubbles to enable working and sanding of the resin). The left antler had a major break and weakness in the beam just past the second tine which had been repaired in the past, and three tines were broken off the antlers. These breaks were consolidated and glued together (see above for details of materials) and where large gaps required filling and modelling, Jesmonite resin (AC100) was used, mixed with plastic phenolic bubbles.


Above: the main beam of the right antler sampled in two places, the antlers in several pieces
(with more breaks hidden where wrapped in hessian), a badly broken antler tine and the thick wire mesh inside some tines where modelling and repair had been undertaken during previous mounting projects.
Metalwork: The legs were never mounted to take the weight of the skeleton. It used to be supported from underneath by two vertical poles. These were missing and needed replacing. The limbs do not have poles inserted through their whole length like most mounted giant deer skeletons, so the legs are loosely held together with wires, metal straps and a few thin internal rods. Not only were the original upright poles missing, there was no obvious place or method indicating how they used to be attached to the metalwork of the vertebrae/ribs. Two new upright supports were fabricated in 20mm diameter steel rod and attachments made on a forge to hold these upright under the body and take the weight. The attachments were welded to the existing horizontal vertebral pole: A broken cervical vertebra allowed the attachment to be secured to the horizontal pole at the front, and the small flat piece of vertebral pole inside the pelvic area was extended to allow the securing of the attachment at the rear. This was mostly hidden from view between the illia of the pelvis. As the rear legs previously just bolted in to the pelvic bone, a new metal bracket was fabricated and welded to the rear attachment for the rear legs to bolt in to so the thin fragile pelvis did not have to take the weight of the legs. Flat horizontal metal strips were welded to the bottom of both vertical poles parallel to the plinth and perpendicular to the axis of the skeleton to help reduce lateral movement of the specimen. Diagonal steel rods had to be welded at approximately 45 degrees between the flat horizontal metal and the vertical poles to provide extra strength and rigidity.
The vertical pole at the front also had to take the weight of the antlers directly. Appropriately shaped holders were made on the forge and welded to the front vertical pole to hold the rear of the antlers in place.
The wooden plinth in the gallery had already been covered with polished limestone so the options for securing the skeleton and mount to the plinth were limited. The distance between the poles was measured, and two holes drilled in the plinth down to the floor, large enough to take metal sleeves into which the vertical poles could be inserted. The sleeves were bonded to the floor with resin overnight. The vertical poles were inserted and the rest of the skeleton assembled. The rear legs bolt in to the metal holder through the acetabulae. The front legs are simply wired to the rib cage. The bottom of each leg has a thin vertical rod inserted into the bone above, and into a small hole drilled into the limestone below, to provide extra stability. The mandible was tied to the skull with polypropylene thread. The mount was found to be quite robust although the skull and antlers will sway if they are pushed or knocked. The Milliput expoxy resin, Jesmonite acrylic resin and glues were all painted-out with artists
acrylic paints.
For more details about what we can do for you, or for a quote, please
contact:
enquiries@natural-history-conservation.com
We
are members of the United Kingdom Institute for Conservation of Historic and
Artistic Works